Navigation Tutorial
Lesson 2 - Compass Skills
All content copyright © Ashley Burke 2008. Not to be copied, duplicated or used for any purpose without permission.
Navigation Tutorial Lesson 2 - Compass Skills
All content copyright © Ashley Burke 2008. Not to be copied, duplicated or used for any purpose without permission. |
Navigation course by Ashley Burke
6.1 The Three Different Norths
Before we get onto the compass and how to use it, I need to describe to you what we mean when we say "north". As I'm sure you are aware, the word "north" refers to the direction of the world's North Pole from where you are now. In actual fact, there are three different types of north, magnetic north, true north, and grid north. Here is the definition that I use for each of these:
| Magnetic North | This is the direction of the Earth's magnetic north pole, which is the axis along which the Earth's magnetic field is aligned. It is not the same as the Earth's axis of rotation or the Earth's lines of longitude. The magnetic north pole is a region in the Canadian arctic. Magnetic North is important to navigation because it is where your compass needle points. |
| True North | This is the direction of the true north pole, which is the Earth's axis of rotation. It is the direction of the Earth's lines of longitude.True north is not normally relevant when navigating. |
| Grid North | This is the direction of the north-south running grid lines on your map. All topographic maps used by bushwalkers have a grid superimposed upon them, and this grid is aligned to grid north. Grid north is slightly different to true north because of the distortion caused by the curvature of the Earth being represented on a flat map sheet. |
Your map will normally have a key showing all of the three norths and the angle between them. The angle that is important to navigation is the angle between magnetic north and grid north, shown below.
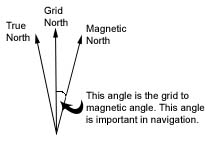
The grid to magnetic angle is the difference between grid north and magnetic north. In New South Wales, this angle is 12°. It may be different in different parts of the world so check your map.
6.2 Map Grid and Quoting a Grid Reference
One last thing about the map before we get to the compass and how to use it. Every topographic map used by bushwalkers has a grid on it, and this grid is aligned with grid north. These grid lines are very important for navigation.The grid lines that run north-south are called eastings and the grid lines that run east-west are called northings.
On most metric scale topographic maps used for bushwalking each square in the grid represents one square kilometre of area.
The grid lines are numbered and these numbers are shown at the margins of the map. These numbers can be used to give coordinates for any point on the map. A grid reference is a set of coordinates for a point on the map. These coordinates are read off from the numbers along the margins of the map with the eastings quoted first. If this is confusing, let's illustrate this with an example.
Figure 6.1 shows a section of a map with the grid lines and their numbering at the margins clearly shown. In this image, the vertical grid lines run north-south and are called eastings, and the horizontal grid lines run east-west and are called northings. Each square formed by the grid lines represents one square kilometre in area.
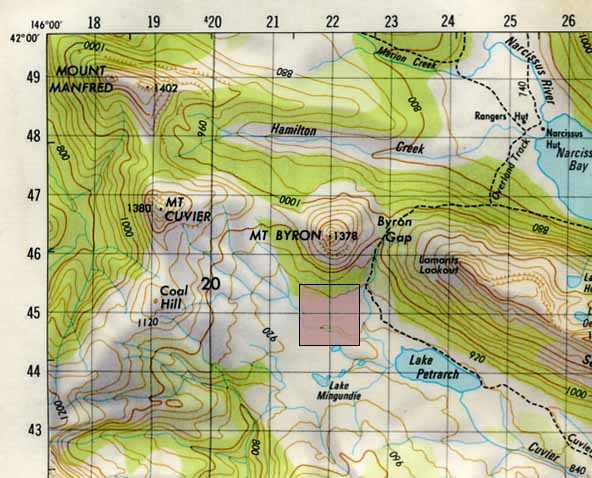
Fig 6.1: A section map showing the numbered grid lines.
Please look at Figure 6.1 above. Look at the vertical line with the number 22. Now look at the horizontal line with the number 45. These two lines meet to the south of Mt Byron. The grid reference for this point where vertical line 22 meets horizontal line 45 can be given as 2245. This is called a four-figure grid reference. 22 is the longitudinal part, 45 is the latitudinal part of the grid reference. It is only accurate to an area of one square kilometre. This four-figure grid reference could actually represent anywhere in the one square kilometre area that I have shaded on the map surrounding the intersection of these two grid lines. This is not normally accurate enough for the purposes of navigation so we normally quote a six-figure grid reference instead. This means we divide each 1km square on the map into a 10x10 grid and include an additional latitudinal and longitudinal digit into the grid reference that allow us to specify the point with greater accuracy. The additional digits are at positions 3 and 6 of the 6 figure grid reference. Thus the intersection of vertical line 22 with horizontal line 45 would have a six-figure grid reference of 220-450. This grid reference is accurate to one hectare (100m x 100m) and therefore much more accurate. For points on the map which don't lie at the intersection of two grid lines, the additional two digits have non-zero values.
So, let's work out the six-figure grid reference for some of the features on the map in Figure 6.1:
Navigators will often use six-figure grid references when communicating locations so it is important that you know how to resolve a grid reference. If someone tells you to meet at 241493 then at least you'll know where on the map they are talking about!
Orienting the map is the process of positioning the map so that north on the map is aligned with north on the ground. When the map is positioned in this way, the orientation of objects on the map is the same as the orientation of those same objects on the ground.
Whilst orienting the map is sometimes useful, a common mistake by people learning to navigate is to do this too often, or to assume that orienting the map is a necessary part of navigation. Experienced navigators rarely orientate the map when navigating through the bush and reserve this activity for curiosity's sake alone when browsing the map and the surrounding countryside. In general I would make the following general remarks about when and when not to orient the map:
Anyway, bearing in mind all of this, here is how to orient the map:
1. Spread the map out on level ground with plenty of space around it so that you can rotate the map.
2. Place the compass on the map and wait for the needle to settle.
3. Rotate the map slowly until the grid lines on the map are aligned with the compass needle that is pointing to magnetic north.
4. Adjust for the grid to magnetic angle by rotating the map anticlockwise by 12°.
The map is now roughly oriented. Figure 6.2 shows an example of a map that is correctly oriented.
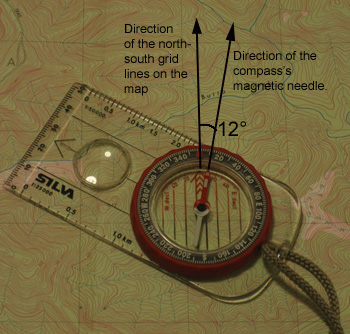
Figure 6.2. Example of a map that is correctly oriented.
Web page created 12 Jul 2008, last updated 12 Jul 2008. All content copyright © Ashley Burke 2008. Not to be copied, duplicated or used for any purpose without permission. |
